
You’ve got your espresso machine, you’ve got your stainless steel jug, and you’ve got the perfect shot pulled. All you need is a gorgeous, velvety milk pour to finish it off… so, why is it so hard to get that milk just right?
Every barista runs the milk steaming gauntlet, testing various tilting angles and milk fat percentages until they achieve exactly what they need to create the perfect microfoam. Now, it’s your turn.
In this blog post, we’ll help you speed up the learning process for how to steam milk. Read on for the hallowed secrets every pro barista learns in their long journey to microfoam (and one or two that are just from us).
What does steaming Milk Really Mean?
When we say ‘steaming milk’, we’re really talking about two things: stretching and texturing.
The former – stretching – is the part where air is introduced into the milk. You’ll hear a gentle hissing or tearing sound as steam breaks the milk’s surface and incorporates tiny bubbles.
The latter – texturing – occurs when you start to emulsify the ‘stretched’ milk. You’ll notice it heated evenly, creating a silky, paint-like consistency.
Combined, these two techniques create something called microfoam: smooth, creamy milk with the glossiest finish known to man. The bubbles are barely visible, and the pour is smooth without being entirely liquid. If we’re talking the holy grail of how to froth milk, this is it.
Essential Tools for steaming Milk at Home
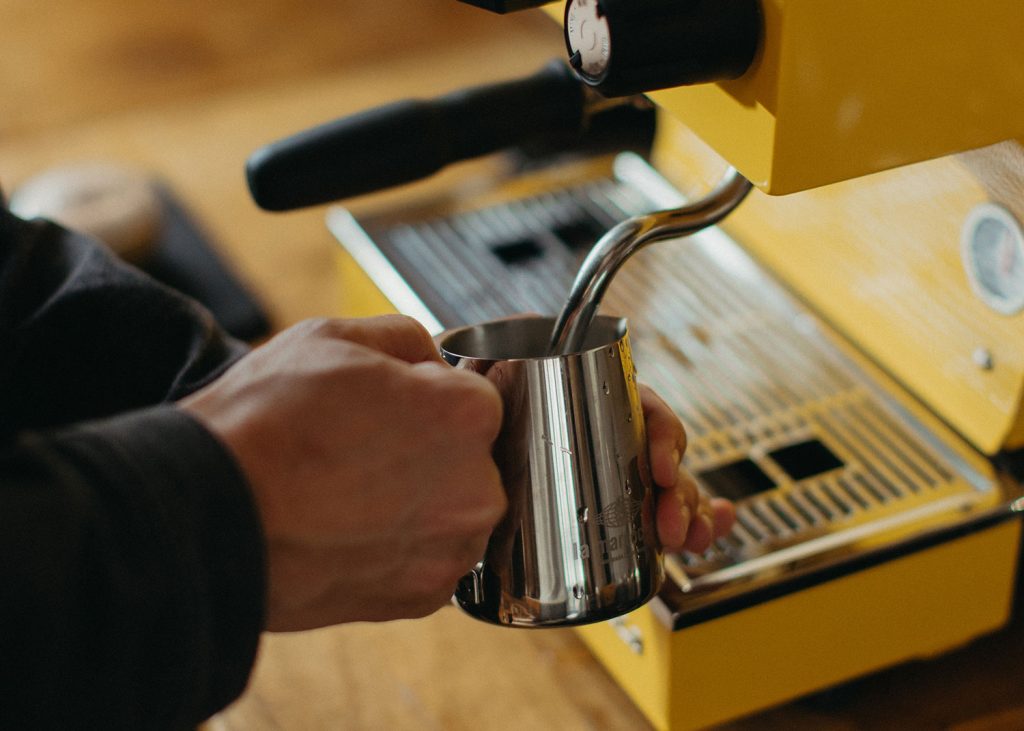
To learn how to steam milk like a pro, you’ll need some dedicated tools of the trade. You’ll need a stainless steel milk jug, a steam wand built into your espresso machine of choice, and a clean cloth to wipe off the wand. You may also want to invest in a milk thermometer, which can be handy when learning or aiming for pinpoint precision.
However, many professional baristas also learn to sense the heat of perfectly steamed milk as it radiates through the steel jug in their hands. If you’re less worried about a specific number and more concerned with learning the trade, you might not need the thermometer at all.
Choosing the Best Milk for steaming
A big part of learning how to steam milk is becoming proficient in selecting the right milk for the job. There are many different types to choose from these days, though some take to frothing better than others.
While there is a lot to be said about your milk choices, here is a quick primer to start with:
- Full-fat dairy, which is any barista’s favourite, thanks to the high fat content, which practically makes it into sculpting clay.
- Skim milk, which steams quickly and can create a lot of foam, but isn’t as great as emulsifying into a smooth microfoam.
- Oat milk, which is the top non-dairy choice (but only barista blends!).
- Almond milk, which is notably trickier to work with as it tends to separate.
- Soy milk, which froths well but might curdle with espresso if you don’t carefully manage your temperatures.
Across the board, you will always get the best results with barista blends, so make sure to source top-quality milk and keep it chilled so as not to waste all your hard work.

Step-by-Step: How to steam Milk Like a Pro Barista
1. Start cold, start clean.
If you take anything away from this guide, let it be this: always start with cold milk. The colder it is, the more time you have to control the frothing process. Fill your steam pitcher to just below the spout; this gives the milk room to expand.
Purge your steam wand before use to clear any residual water or milk residue. With that, you’re ready to go.
2. Stretch the milk.
Insert the steam wand just below the milk’s surface and turn on the steam. You should hear a gentle tearing or chirping sound (that’s the air making its way into the milk). This is the ‘stretching’ phase.
Here’s the thing: you only want to stretch the milk until it reaches body temperature. At that point, you’ll feel the steel of the jug warm to your touch.
3. Texture the milk.
Once the milk is warm enough, lower the wand deeper into the jug and slightly angle the jug to create a whirlpool motion. This textures the milk, breaking down the bubbles and folding the air into the milk. Heat everything until the milk reaches between 60 and 65 degrees Celsius. Avoid tipping the scales much higher, as this is when the milk starts to actually scald.
4. Polish and pour.
Final touches make the milk sing, so make like a pro and put some polish on it. Once you’ve turned off the steam, wipe and purge your wand, then swirl the milk in the jug as it sits on the countertop. You should see a glossy, paint-like finish. If you’re still seeing bubbles, give the jug a firm tap on the bench and swirl again to disperse them.
That’s it: you have microfoam! Don’t let this sit and wait. Pour immediately onto a prepared espresso shot, starting high and finishing low for more control over the final look.
Select your milk carefully, go slowly, and most of all: practice. The more you practice how to froth milk, the more you’ll improve. And who knows? There might be a cup or two of latte art in your future.
Learn how to steam milk on the espresso machine of your dreams.
At La Marzocco, it’s all about the soul of a cup of coffee. Our home espresso machines blend a long line of Italian espresso mastery with precise modern engineering to put the best tools on your kitchen counter.
Explore all you can do with the right coffee machine. Browse the La Marzocco range today.